Mascara Launch for Voluminous Eye Lashes: Transform Your Look

Mascara has the power to transform even the simplest makeup look, and the results can be dramatic. The average woman will spend nearly 95 days of her life applying mascara, turning it from a quick touch-up into a daily ritual. But surprisingly, most people never unlock the secret to creating truly voluminous, eye-catching lashes—and it all starts long before you reach for that mascara wand.
Table of Contents
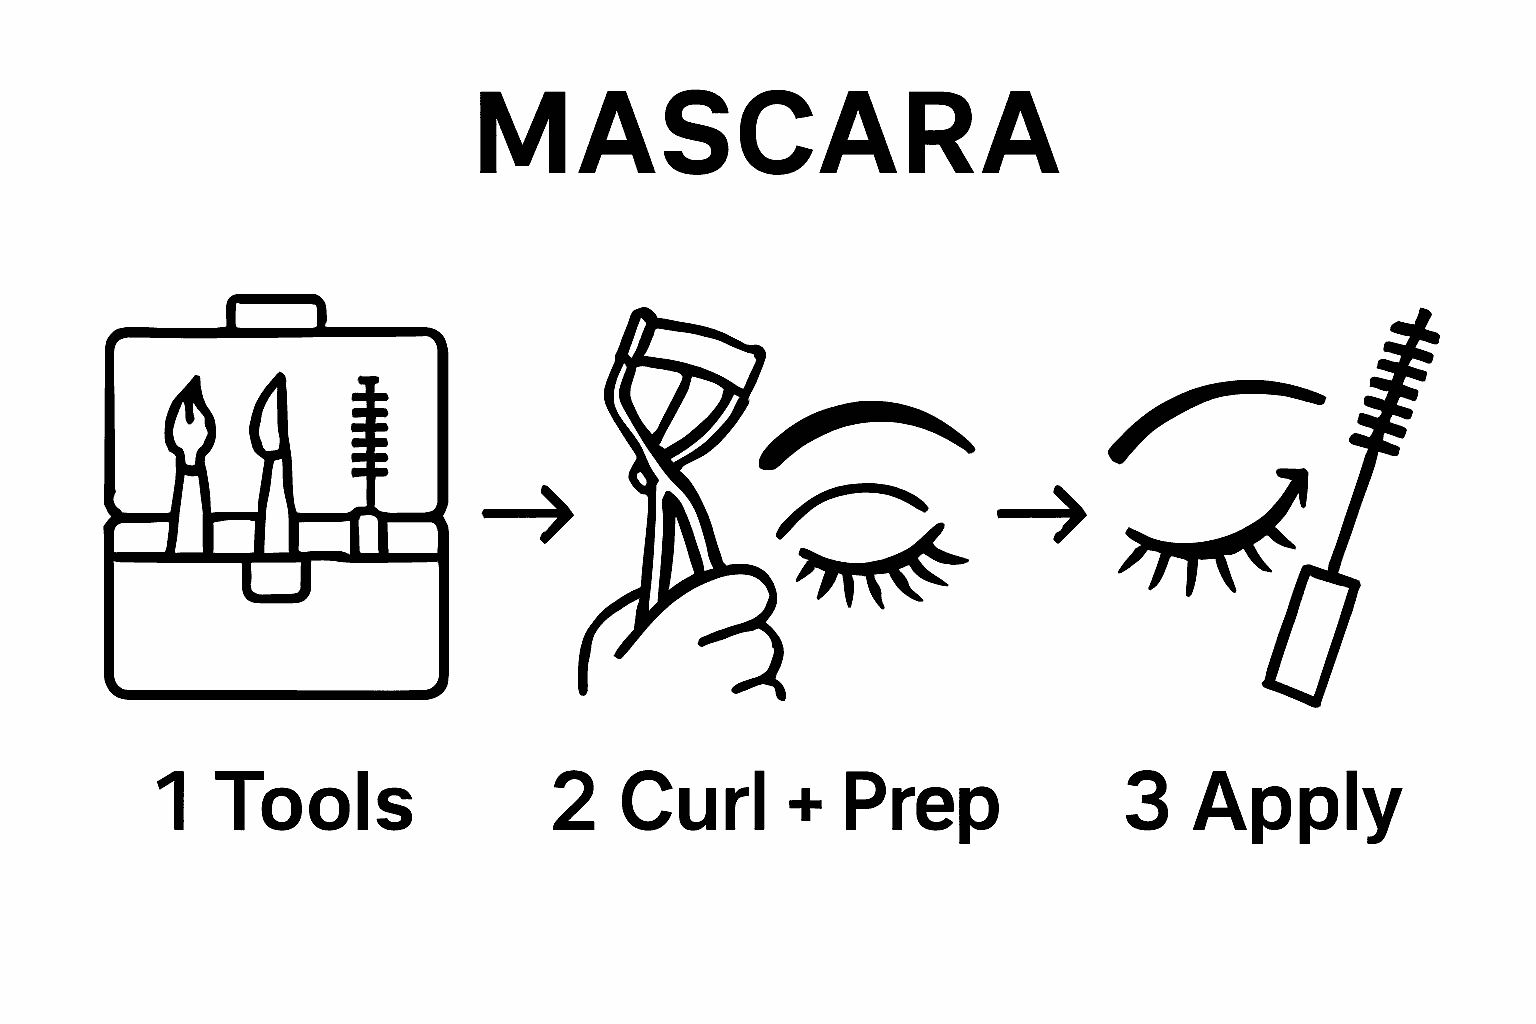
- Step 1: Gather Your Essential Mascara Tools
- Step 2: Prepare Your Lashes for Maximum Volume
- Step 3: Apply Mascara for Optimal Length and Thickness
- Step 4: Assess and Adjust for Flawless Finish
Quick Summary
| Key Point | Explanation |
|---|---|
| 1. Gather essential mascara tools | Use a high-quality mascara, eyelash curler, and a spoolie brush for the best results. |
| 2. Prepare lashes properly | Cleanse and condition lashes before mascara application to ensure better adhesion and volume. |
| 3. Utilize effective application techniques | Apply mascara in thin layers; wiggle the wand for even coverage and volume distribution. |
| 4. Assess for evenness and symmetry | Check lashes from multiple angles for clumps or uneven application, making adjustments as needed. |
| 5. Practice patience for perfect results | Take your time with each application step to improve technique and achieve flawless lashes over time. |
Step 1: Gather Your Essential Mascara Tools
Transforming your eye makeup begins with assembling the right tools for creating voluminous, stunning lashes. Professional makeup artists understand that preparation is key to achieving a flawless mascara application. Before diving into the application process, you will need to collect a few essential items that will help you create a perfect look.
Essential Mascara Application Tools
Your toolkit for magnificent lashes should include several strategic components. Start with a high-quality mascara specifically designed for volume and length. Precision is crucial, so invest in a well-crafted product that matches your specific lash needs. Alongside your mascara, you will want an eyelash curler to create beautiful lift and definition before application. A clean spoolie brush or an old mascara wand can help separate and define lashes, preventing clumping and ensuring smooth coverage.
Additional tools that can elevate your mascara application include:
- Eyelash curler: Creates beautiful arch and lift
- Precision tweezers: For removing any stray mascara smudges
- Makeup remover wipes: For quick cleanup and correction
- Cotton swabs: Helpful for precise touch-ups and detailing
Professional makeup artists recommend selecting tools that complement your specific eye shape and lash type. The right combination of tools can dramatically enhance your final look, transforming ordinary lashes into a captivating feature.
Before starting your application, ensure your workspace is well-lit and you have a clean, stable surface. Natural daylight provides the best illumination for precise makeup application. Pro tip: Always check your mascara’s expiration date, as expired products can cause eye irritation and deliver subpar results. Most mascaras should be replaced every three to six months to maintain optimal performance and hygiene.
Like our step by step natural makeup guide for women over 40, gathering the right tools sets the foundation for a stunning makeup look. By carefully selecting and preparing your mascara tools, you are setting yourself up for success in creating voluminous, eye-catching lashes that will make you feel confident and beautiful.
Here is a quick-reference table summarizing key tools required for voluminous mascara application, along with their specific purposes.
| Tool | Purpose |
|---|---|
| High-quality mascara | Adds volume and length to lashes |
| Eyelash curler | Creates lift and curl before application |
| Clean spoolie brush | Separates lashes and removes excess product |
| Makeup remover wipes | Allows for quick cleanup and correction |
| Precision tweezers | Removes stray mascara smudges |
| Cotton swabs | Enables precise touch-ups and detailing |
Step 2: Prepare Your Lashes for Maximum Volume
Preparing your lashes is a critical step in achieving stunning, voluminous eye makeup that commands attention. This preparatory phase sets the foundation for a flawless mascara application, ensuring your lashes look fuller, longer, and more defined. Think of this process as priming a canvas before painting a masterpiece.
Cleansing and Conditioning
Begin by thoroughly cleansing your eye area to remove any residual makeup, oils, or debris that could interfere with mascara application. Use a gentle eye makeup remover that effectively cleanses without harsh rubbing. Gentle circular motions work best when removing previous makeup, protecting the delicate skin around your eyes. After cleansing, allow your lashes to dry completely. Moisture can prevent mascara from adhering properly and may cause clumping or smudging.
Conditioned lashes provide the optimal base for volumizing mascara. Dermatological research suggests that proper lash preparation can significantly improve makeup application and longevity. Consider applying a lightweight lash conditioning serum or primer that nourishes and strengthens your lashes while creating an ideal surface for mascara.
Curling Technique for Maximum Lift
The eyelash curler is your secret weapon for creating dramatic, eye-opening volume. Position the curler at the base of your lashes, ensuring you capture all the hair without pinching your skin. Pro tip: Warm your eyelash curler slightly with a hair dryer for 3-5 seconds to help the curl hold longer. Hold the curl for 10-15 seconds, moving from the base to the tips for a natural, lifted look.
If you have straight or stubborn lashes, consider these additional techniques:
- Curl lashes before applying any eye makeup
- Use a heated eyelash curler for more persistent lashes
- Apply a light layer of translucent powder before curling to help hold the shape
For those with sensitive eyes or concerns about traditional curling methods, our Luméra Voluminous Mascara offers built-in lifting properties that can help create volume without extensive pre-curling.
Verify your lash preparation by checking for these key indicators: lashes are clean, dry, and have a slight natural curl. Your lashes should feel soft and be free from any old makeup residue. A successful preparation means your mascara will glide on smoothly, creating a seamless, voluminous look that enhances your natural beauty.
Remember, patience during preparation translates to stunning results. Take your time with each step, and you will be rewarded with eye-catching, dramatic lashes that make a statement.
Step 3: Apply Mascara for Optimal Length and Thickness
The moment of transformation begins with precise mascara application. Achieving voluminous, dramatic lashes requires more than simply swiping product across your eyelashes. Technique matters significantly in creating a professional, eye-catching look that enhances your natural beauty.
Start by wiping excess product from the wand using the mascara tube’s inner rim. This prevents clumping and ensures a smooth, even application. Pro tip: Wiggle the wand slightly at the base of your lashes, then sweep upward in a gentle, controlled motion. This technique helps separate and coat each individual lash, creating maximum volume and length.
Professional makeup artists recommend a strategic approach to mascara application, focusing on layering and technique rather than quantity. Begin with your lower lashes by holding the wand vertically, using the tip to carefully apply product without creating smudges. For upper lashes, start at the base and move the wand in a slight zigzag motion, which helps distribute product more evenly and prevents clumping.
Consider these critical application strategies:
- Apply mascara in thin, multiple layers
- Allow each layer to dry slightly before adding the next
- Use different angles and techniques for inner and outer lashes
- Rotate the wand as you move from base to tip for maximum coverage
Pay special attention to your lash corners and hard-to-reach areas.
The inner and outer lash lines often require more precise application. Use the very tip of your mascara wand for these delicate sections, ensuring no lash is left untouched. For those seeking extra drama, consider focusing additional product on the center and outer lashes to create a wide-eyed, lifted effect.
If you encounter clumping, keep a clean spoolie brush nearby to gently separate lashes and remove excess product. Patience is key during application. Rush the process, and you risk creating a messy, uneven look. Take your time, and let each layer set slightly before adding the next.
Our guide to natural makeup techniques emphasizes the importance of subtle, buildable application. The same principle applies to mascara. Your goal is to enhance your natural lashes, not overwhelm them.
Verify a successful application by checking for these signs: lashes appear separated, volumized, and free from heavy clumps. They should look naturally enhanced, with a consistent color and lift from base to tip. When done correctly, your mascara should make your eyes appear more open and vibrant, creating a polished, professional look that lasts throughout the day.
Step 4: Assess and Adjust for Flawless Finish
The final stage of mascara application transforms good makeup into a truly exceptional look. This critical assessment phase determines whether your mascara application achieves the desired volume, length, and overall aesthetic. Precision and attention to detail are your ultimate tools in creating a flawless finish.
Once you complete your initial application, step back from the mirror and examine your lashes from multiple angles. Natural lighting provides the most accurate representation of your makeup, so position yourself near a window or well-lit area. Careful observation allows you to identify any uneven application, clumping, or areas requiring additional refinement.
Makeup experts emphasize the importance of strategic touch-ups and corrections to achieve a professional-quality look. Use a clean spoolie brush to gently separate any lashes that have stuck together during application. Rotate the brush horizontally and vertically, creating soft, natural-looking separation that enhances overall volume and definition.
Address potential imperfections with these targeted correction techniques:
- Use a clean cotton swab for precise smudge removal
- Gently brush through lashes to eliminate clumps
- Blot excess product with a clean tissue
- Adjust mascara coverage on inner and outer lash lines
Symmetry is key when assessing your final look. Compare both eyes to ensure consistent volume, curl, and application. Small asymmetries are natural, but significant differences can disrupt the overall balance of your eye makeup. If one eye appears dramatically different, carefully reapply mascara to create a more uniform appearance.
Use this troubleshooting table to quickly identify and solve common mascara application issues mentioned in the article.
| Problem | Possible Cause | Solution |
|---|---|---|
| Clumpy lashes | Excess product or rushed layering | Use spoolie brush to separate, reapply if needed |
| Smudges on eyelids | Overloaded wand or shaky hands | Clean with cotton swab or makeup wipe |
| Uncurling lashes | Damp lashes or weak curl | Ensure lashes are dry, re-curl if needed |
| Uneven lash appearance | Inconsistent application | Assess in natural light, touch up as needed |
| Stuck-together lashes | Insufficient separation | Gently brush through with clean spoolie |
For those seeking extra drama or definition, consider a second light layer of mascara. Important: Allow the first layer to dry completely before applying additional product. This prevents clumping and ensures a smooth, professional finish. Wiggle the wand at the lash base during this second application to add extra volume and intensity.
Check for these final verification signs of a perfect mascara application:
- Lashes appear separated and defined
- No visible clumps or heavy product buildup
- Consistent color and coverage across both eyes
- Natural, lifted appearance that enhances eye shape
Our Luméra Voluminous Mascara is designed to make this final assessment easier, providing a formula that naturally separates and defines lashes with minimal effort.
Remember that mascara is an art form, and like any skill, it improves with practice. Each application teaches you more about your unique eye shape, lash characteristics, and personal style. Embrace the process, be patient with yourself, and enjoy the transformation that comes with perfectly applied mascara.
Discover Your Most Voluminous Lashes Yet
Are you tired of dull, lifeless lashes that never seem to hold volume or definition? This article showed you step-by-step how the right preparation and mascara technique can completely change your eye look. Still, achieving those dramatic, separated lashes often feels out of reach without the right products and tools that tackle clumping, smudging, and lack of lift.
Explore the Luméra Eye Collection and find expertly formulated mascaras, innovative eyelash curlers, and everything you need for a vibrant, eye-catching finish. Each product is created to address your daily lash struggles, from stubborn straight lashes to the frustration of uneven application.

It’s time to experience the volume and length you have always wanted. Visit Luméra Cosmetica to shop our best-selling mascara or browse exclusive tips and tools for a flawless look. See how our Eye Makeup Collection can transform your routine. Don’t wait—unlock your boldest lash transformation and step into your most confident self now.
Frequently Asked Questions
What are the essential tools for applying mascara?
To achieve voluminous lashes, it’s important to have high-quality mascara, an eyelash curler, a clean spoolie brush, and makeup remover wipes. Additional tools like precision tweezers can also help with touch-ups.
How can I prepare my lashes for optimal mascara application?
Start by cleansing your lashes to remove any makeup or oils. After cleansing, consider applying a lightweight lash conditioning serum. Using an eyelash curler prior to applying mascara creates more lift and enhances volume.
What techniques should I use for applying mascara to achieve the best results?
Wipe excess mascara from the wand before application. Apply in thin layers, wiggling the wand at the base to coat each lash. Use a zigzag motion for upper lashes and hold the wand vertically for the lower lashes to avoid clumps.
How can I fix clumpy mascara or uneven application?
Use a clean spoolie brush to separate clumped lashes. Alternatively, a cotton swab can be used to remove smudges. If necessary, reapply mascara lightly to achieve a more uniform finish.