How to Apply Lipstick: A Step-by-Step Guide

Everyone wants their lipstick to look flawless and last all day. Still, most people end up with smudges or patchy color before lunch. But did you know that using translucent powder through a tissue can dramatically increase your lipstick’s staying power without making your lips feel heavy. This little-known step changes everything you thought you knew about a polished, professional lip look.
Table of Contents
- Step 1: Prepare Your Lips For Application
- Step 2: Choose The Right Lipstick Shade
- Step 3: Apply Lip Liner For Definition
- Step 4: Smoothly Apply The Lipstick
- Step 5: Check For Even Coverage And Touch Up
- Step 6: Set Your Lipstick For Longevity
Quick Summary
| Key Point | Explanation |
|---|---|
| 1. Exfoliate and hydrate your lips | Start by gently removing dry skin and moisturizing to create a smooth, hydrated lip surface for lipstick application. |
| 2. Identify your skin’s undertone | Determine if your skin’s undertone is cool, warm, or neutral to choose lipstick shades that complement your natural coloring. |
| 3. Use lip liner for definition | Apply a matching lip liner to define edges, prevent color bleeding, and enhance the longevity of your lipstick. |
| 4. Apply lipstick with precision | Use a lip brush for even coverage, starting from the center and moving outward, to achieve a polished finish. |
| 5. Set lipstick for all-day longevity | Lightly dust translucent powder over your lips to lock in color and avoid feathering, ensuring a fresh look throughout the day. |
Step 1: Prepare Your Lips for Application
Beautiful lipstick application starts long before the color touches your lips. Proper lip preparation transforms an average makeup look into a flawless, professional finish. Think of your lips as a canvas that requires careful priming to showcase color at its absolute best.
Creating the Perfect Lip Surface
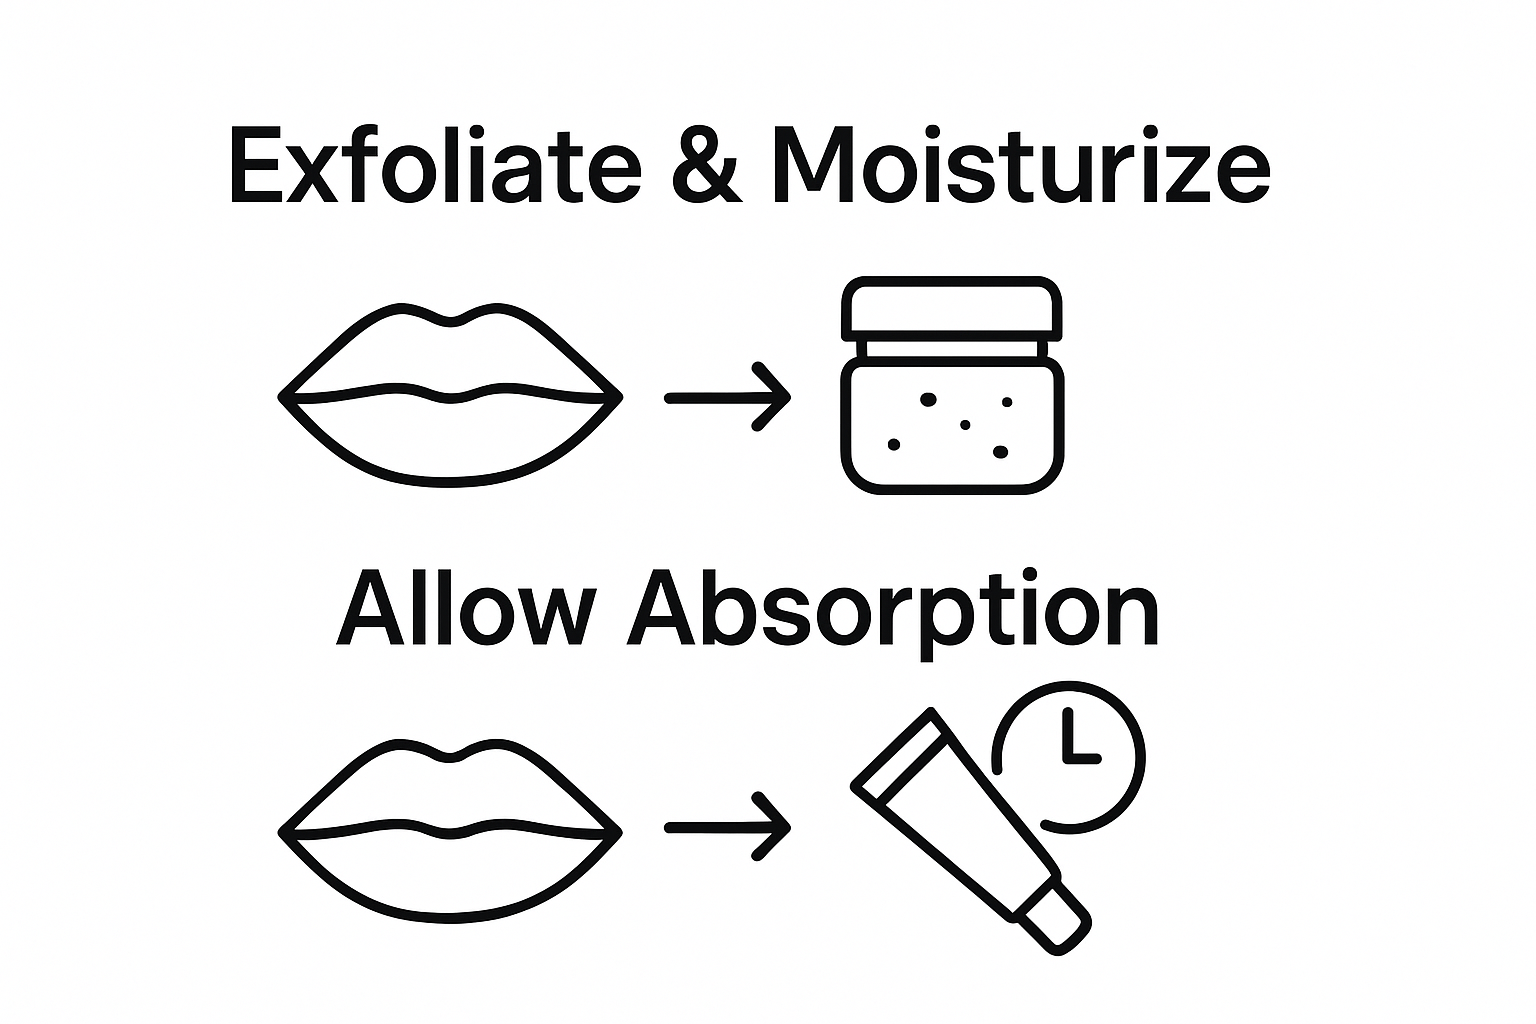
The secret to stunning lipstick lies in creating a smooth, hydrated foundation. Begin by gently exfoliating your lips to remove any dry, flaky skin that could interrupt your lipstick’s smooth application. You can create a simple homemade scrub using honey and sugar or purchase a specialized lip exfoliant. Massage the scrub in circular motions using your fingertip, working carefully to avoid irritating the delicate lip skin. After exfoliation, rinse with lukewarm water and pat dry with a soft towel.
Next, focus on deep hydration. Apply a nourishing lip balm immediately after exfoliating to replenish moisture and create a protective barrier. Choose a balm with ingredients like vitamin E, shea butter, or hyaluronic acid that provide intense hydration without feeling heavy. Allow the balm to absorb completely - about 5 to 7 minutes - before moving to lipstick application. This waiting period ensures your lips are perfectly primed.
According to research from PubMed, proper lip preparation can significantly improve lipstick appearance and longevity. The study highlights how moisturized lips not only look better but also help makeup adhere more effectively.
For those with persistently dry lips, consider an overnight lip treatment. Apply a thick layer of healing balm before bed to wake up with soft, supple lips ready for flawless color application. Remember that consistent lip care matters more than last-minute preparation.
Here is a checklist to help you verify your lips are fully prepped before moving on to lipstick application. Use this table to ensure each preparation step is complete and your lips are ready for flawless color.
| Step | What to Look For | How to Verify |
|---|---|---|
| Gentle exfoliation | Lips feel smooth, no rough patches | Run finger across lips for roughness |
| Application of nourishing lip balm | Lips are soft and hydrated | Lips look plump, not dry or tight |
| Waiting for balm absorption (5-7 min) | No greasy residue, balm absorbed | Touch lips, feel slight softness |
| Final touch test | No flakiness or residual dryness | Observe and lightly press lips |
Verify your lips are ready by doing a simple touch test: gently run your finger across your lips. They should feel smooth, soft, and free of rough patches. If you detect any remaining dry areas, repeat the exfoliation and moisturizing process before applying lipstick.
Step 2: Choose the Right Lipstick Shade
Selecting the perfect lipstick shade is an art form that transforms your entire makeup look. The right color can illuminate your complexion, boost confidence, and complement your personal style. Unlike popular myths, choosing a lipstick isn’t about blindly following trends but understanding your unique features and personal aesthetic.
Understanding your skin’s undertone becomes the cornerstone of lipstick selection. Skin undertones are classified into three primary categories: cool (pink or blue undertones), warm (yellow or golden undertones), and neutral (a balanced mix). To determine your undertone, examine the veins on your inner wrist under natural light. Blue or purple veins indicate cool undertones, while green-tinted veins suggest warm undertones. Neutral undertones will see a mixture of colors or struggle to distinguish between them.
According to Avenue Five Institute, matching your lipstick to your natural lip color provides an excellent starting point. For individuals with pale lips, soft pinks and nude shades work wonderfully. Those with deeper lip pigmentation might explore richer tones like deep berries, warm browns, or intense reds that complement their natural coloration.
Consider your overall appearance when making your selection. Fair skin tones often shine in soft pinks, light corals, and subtle neutrals. Medium skin tones can experiment with a broader palette, including berry shades, mauves, and warm terracotta colors. Deeper skin tones look stunning in rich plums, deep wines, and vibrant orangey-reds that provide striking contrast.
Before committing to a full application, always test the lipstick shade. Most makeup counters offer testers - apply a small amount to your fingertip or the side of your hand to preview how the color interacts with your skin tone. Natural lighting provides the most accurate representation, so step near a window or natural light source when evaluating the shade. Wear the color for a few minutes and observe how it complements your overall complexion and personal style. Remember, confidence is the ultimate accessory that makes any lipstick shade truly spectacular.
Step 3: Apply Lip Liner for Definition
Lip liner transforms an ordinary lipstick application into a professional, polished look. This crucial step creates crisp boundaries, prevents color bleeding, and helps your lipstick stay in place throughout the day. Think of lip liner as the architectural blueprint that gives your lip color structure and precision.
Begin by selecting a lip liner that closely matches your chosen lipstick shade. Professional makeup artists recommend choosing a liner that is either identical to your lipstick or slightly darker to create subtle depth. For nude or neutral lipsticks, a liner in a soft brown or nude tone works beautifully. When working with bold reds or deep berry shades, matching the liner precisely becomes even more critical.
The application technique requires a steady hand and careful attention. Start by identifying your natural lip line, which might differ slightly from your actual lip edge. Use a sharp, well-maintained lip liner pencil and approach the task with light, feathered strokes. Begin at the cupid’s bow - the dramatic curve at the center of your upper lip - and work outward towards the corners. Draw short, gentle lines that follow your natural lip contour, avoiding harsh or exaggerated lines that can look unnatural.
According to ConnectCenter’s makeup guidance, lip liner serves multiple purposes beyond just defining edges. It creates a protective barrier that prevents lipstick from bleeding or feathering, especially for those with fine lines around the mouth. For individuals with asymmetrical lips, lip liner becomes an invaluable tool for creating the illusion of balanced, perfectly shaped lips.
After outlining, slightly fill in your lips with the liner before applying lipstick. This technique creates a base color that helps your lipstick last longer and provides more even coverage. Use the side of the liner pencil to softly shade the entire lip area, creating a uniform background for your lipstick application. When you’re finished, your lips should have a soft, even color that serves as the perfect canvas for your chosen lipstick shade.
Verify your lip liner application by checking symmetry in a well-lit mirror. The lines should be smooth, consistent, and follow your natural lip shape without looking overly drawn or artificial. A perfectly applied lip liner sets the stage for a flawless, professional lipstick finish.
Step 4: Smoothly Apply the Lipstick
The moment of lipstick application is where precision meets artistry. After carefully preparing your lips and defining their shape with liner, you’re ready to transform your look with color. Smooth, controlled application separates a professional finish from an amateur attempt.
Professional makeup artists recommend using a lip brush for the most precise and even coverage. While direct application from the lipstick tube works, a brush allows for more controlled, nuanced color placement. If using the tube directly, start from the center of your lips and move outward in gentle, sweeping motions. Ensure you’re working with clean, steady hands and good lighting to catch every detail.
Begin by opening your mouth slightly to create tension in the lip skin, which helps create a smoother application surface. Start at the center of your upper lip, specifically the cupid’s bow, and work your way towards the corners. Use light, feathered strokes rather than heavy, dense applications. This technique prevents color from looking thick or cakey and ensures a more natural, sophisticated finish.
According to Evergreen Beauty College, layering is key to achieving rich, long-lasting color. After the first application, blot your lips gently with a tissue to remove excess product. Then, apply a second thin layer to build intensity and improve staying power. This method helps prevent color from bleeding or smudging and creates a more even, professional look.

For those seeking extra precision, consider using a concealer brush to clean up the edges around your lips after application. This technique creates crisp, defined lines and prevents color from bleeding into fine lines around the mouth. Dip a small, angled concealer brush into a lightweight concealer and trace around the lip line, creating a sharp boundary that makes your lipstick look perfectly applied.
Verify your application by checking for even color distribution and symmetry in a well-lit mirror. Your lips should have a smooth, consistent color with no patchy areas or uneven edges. Gently press your lips together to blend the color and ensure it sits naturally on your lips. A perfectly applied lipstick should look effortless, as though the color is a natural extension of your own lip tone.
Step 5: Check for Even Coverage and Touch Up
The final stage of lipstick application is as crucial as the initial steps. This is where you transform a good makeup look into a flawless, professional finish. Precision and attention to detail separate an amateur application from a polished, sophisticated appearance.
Start by examining your lipstick in natural, well-lit lighting. Natural daylight provides the most accurate representation of color and reveals any uneven patches or missed spots. Use a handheld mirror or stand near a window to ensure you can see every nuance of your lip color. Gently press your lips together and observe how the color sits - it should appear smooth and consistent across both the upper and lower lip.
To verify evenness, use your index finger to trace the outline of your lips. This technique helps you detect any areas where the color might be thinner or where the application looks patchy. Pay special attention to the corners of your mouth and the center of your lips, as these areas often require additional product or blending.
According to The American Printing House for the Blind, blotting is a key technique for achieving a perfect finish. Take a clean, soft tissue and gently press it against your lips, removing excess product and setting the color. This method helps prevent feathering and creates a more long-lasting application. After blotting, you can choose to apply a very light dusting of translucent powder to further set the lipstick and increase its staying power.
For minor touch-ups, keep a small concealer brush and matching lip liner nearby. If you notice any bleeding or uneven edges, use the concealer brush to create crisp, clean lines around your lips. A lip liner can help reshape or correct any slight imperfections in your lipstick application. Remember that subtle corrections are more effective than completely reapplying your lipstick.
Verify your final look by taking a step back and assessing your entire makeup. Your lipstick should complement your overall appearance, enhancing your natural features without overwhelming them. A perfectly applied lipstick looks effortless - as though the color is a natural extension of your own lips, creating a polished and confident look.
Step 6: Set Your Lipstick for Longevity
The final frontier of lipstick application is ensuring your carefully crafted look remains impeccable throughout the day. Setting your lipstick isn’t just about vanity - it’s about maintaining a polished appearance that withstands conversations, meals, and unexpected moments.
Translucent powder is your secret weapon for creating a long-lasting lip look. After your initial lipstick application, take a clean tissue and fold it in half. Gently place the tissue over your lips, then use a fluffy powder brush to lightly dust translucent powder through the tissue. This technique sets the color without removing its vibrancy or creating a heavy, cakey finish. The tissue acts as a protective barrier, allowing just enough powder to penetrate and lock your lipstick in place.
For those seeking extra staying power, consider the tissue blotting and reapplication technique. After your first lipstick layer, blot with a tissue to remove excess moisture. Then, apply a second thin layer of lipstick. This method builds color intensity while simultaneously creating multiple adhesion points that help your lipstick resist fading. Think of it like creating molecular bonds that anchor your lip color more effectively.
According to research in the International Journal of Cosmetic Science, the choice of lipstick ingredients significantly impacts its longevity. While you can’t control the lipstick’s original formulation, you can enhance its performance through strategic application techniques. Avoid licking your lips or pressing them together too frequently, as these actions can break down the lipstick’s molecular structure and cause premature fading.
Carry a small touch-up kit for midday maintenance. Include a compact mirror, your lipstick, a lip liner, and a tissue. If you notice any color wear, gently blot your lips and reapply a thin layer. For precise edges, use your lip liner to recreate crisp boundaries. This approach ensures your lip color remains fresh and vibrant, regardless of how busy or unpredictable your day becomes.
Verify your lipstick’s longevity by checking your reflection periodically. A well-set lipstick should maintain its color intensity and crisp edges for several hours. Look for even color distribution and absence of feathering or bleeding. Your goal is a polished, confident lip look that requires minimal maintenance and maximum impact.
Compare the effects and purposes of the two key lipstick setting techniques described. This table will help you decide which method best fits your routine and desired longevity.
| Technique | How to Do It | Benefits | When to Use |
|---|---|---|---|
| Translucent powder through tissue | Place tissue over lips, dust powder on top | Locks in color, prevents feathering | For all-day wear |
| Blotting and reapplication | Apply one layer, blot with tissue, repeat application | Builds color, increases longevity | For extra staying power |
| Touch-up with compact kit | Reapply lipstick as needed, use liner for edges | Maintains look throughout day | For quick midday fixes |
Reveal Your Most Beautiful Lips with Lumera Cosmetica
You have worked hard to master the art of natural lipstick application by following each step and carefully preparing your lips. If you still struggle with dry lips, uneven color, or short-lived results, you are not alone. Many readers want effortless hydration, a perfect shade match, and all-day color but find ordinary products fall short of their expectations.
It is time to experience professional quality at home. Discover the difference when you choose nourishing formulas and expert shade selection from Lumera Cosmetica. Our products are designed to support smooth application, beautiful definition, and vibrant wear all while caring for your lips. If you are ready to see how the right lipstick elevates your look every day, visit our main page and explore the collection. Do not wait to transform your daily lip routine into a confident, flawless experience—start your journey to healthy, stunning lips today.
Frequently Asked Questions
How do I prepare my lips before applying lipstick?
Begin by exfoliating your lips to remove any dry skin using a homemade scrub of honey and sugar or a specialized lip exfoliant. After exfoliation, apply a nourishing lip balm and let it absorb for about 5 to 7 minutes to ensure your lips are smooth and hydrated.
How can I choose the right lipstick shade for my skin tone?
Understanding your skin’s undertone—cool, warm, or neutral—is key to selecting the right lipstick shade. Test lipsticks that match your natural lip color, and consider complementary shades based on your skin tone: soft pinks for fair skin, berry shades for medium skin, and rich plums or reds for deeper skin tones.
Why should I use lip liner before applying lipstick?
Lip liner helps define your lip shape, prevents lipstick from bleeding, and can make your color last longer. It creates a smooth boundary for your lipstick application, ensuring a clean and polished look.
How do I ensure my lipstick stays on longer?
To enhance lipstick longevity, lightly dust translucent powder over your lips after application using a tissue as a barrier. Additionally, consider the blotting and reapplication technique to build layers and ensure a lasting finish.