How to rescue dried lipstick: simple fixes for lasting color

TL;DR:
- Dried lipstick can often be revived using gentle oils and simple techniques.
- Proper storage and quick fixes help maintain lipstick freshness and longevity.
- Reviving lipstick is a sustainable, cost-effective way to respect your beauty routine.
You reach for your favorite lipstick shade before a night out, twist the tube, and find a crumbly, dried-out mess. It’s one of those small beauty frustrations that feels surprisingly personal, especially when the color is a discontinued shade or a hard-won perfect match. The good news is that dried lipstick is almost never a lost cause. Whether you’re working with a classic bullet formula or a modern liquid lipstick, there are gentle, affordable methods to bring it back to life. This guide walks you through everything, from gathering the right supplies to step-by-step rescue techniques designed with mature lips in mind.
Table of Contents
- Before you start: What you need and why
- Step-by-step: Rescuing dried liquid lipstick
- How to salvage traditional bullet lipstick
- Troubleshooting: What to do if your lipstick is still dry
- Why rescuing lipstick is worth it for women over 40
- Upgrade your lipstick routine with Luméra Cosmetica
- Frequently asked questions
Key Takeaways
| Point | Details |
|---|---|
| Simple lipstick revival | You can rescue most dried lipsticks at home with just a few common ingredients. |
| Gentle methods for mature lips | Using light oils and careful heating works well for rejuvenating lipstick without irritating mature skin. |
| Sustainable, cost-saving DIY | Reviving old lipstick reduces waste and saves money for women 40 and above. |
| Know when to let go | If your lipstick smells off or changes color after rescue attempts, it’s safest to replace it. |
Before you start: What you need and why
With the value of rescuing your lipstick clear, let’s start by gathering what you need. Having the right tools on hand makes the difference between a smooth fix and a sticky mess. The good news is that most of what you need is probably already in your home.
Essential supplies at a glance:
| Supply | Purpose | Why it matters for mature lips |
|---|---|---|
| Jojoba oil | Restores moisture to formula | Lightweight, non-irritating, absorbs well |
| Vitamin E oil | Adds hydration and antioxidants | Supports skin comfort and lip health |
| Coconut oil (fractionated) | Softens dried formula | Gentle and stable at room temperature |
| Vaseline (petroleum jelly) | Binds and smooths texture | Seals in moisture, great for dry lips |
| Warm water | Loosens formula gently | Safe for sealed tubes |
| Small clean jar or palette | Stores melted or mixed product | Keeps rescued lipstick hygienic |
| Toothpick or small spatula | Mixing tool | Prevents contamination from fingers |
As DIY lipstick rescue methods show, these fixes add moisture, are gentle for mature lips, and save money compared to replacing products.
Why each ingredient matters:
- Jojoba oil mimics the skin’s natural sebum, making it ideal for lips that tend to feel tight or thin with age.
- Vitamin E oil is thick and nourishing, perfect for adding back the emollient quality that dried lipstick loses over time.
- Fractionated coconut oil stays liquid at room temperature and blends easily without altering the lipstick’s color.
- Vaseline is a classic for a reason. It locks in moisture and creates a smooth base, which is especially helpful if you follow lipstick tips for mature skin that recommend extra hydration before applying color.
A note on safety: Always check the lipstick’s expiration date before attempting a rescue. Most lipsticks last 12 to 24 months. If yours smells unusual, has changed color, or has visible mold, discard it immediately. No rescue is worth a lip infection.
Pro Tip: Use a fresh toothpick or disposable spatula for every mixing session. This keeps bacteria out of your rescued product and extends its usable life.
Step-by-step: Rescuing dried liquid lipstick
Now that you’re prepared, let’s dive into restoring liquid lipstick with proven methods. Liquid formulas dry out when the solvent inside evaporates, usually because the cap wasn’t sealed tightly or the product sat unused for too long. The fix is simpler than you’d expect.
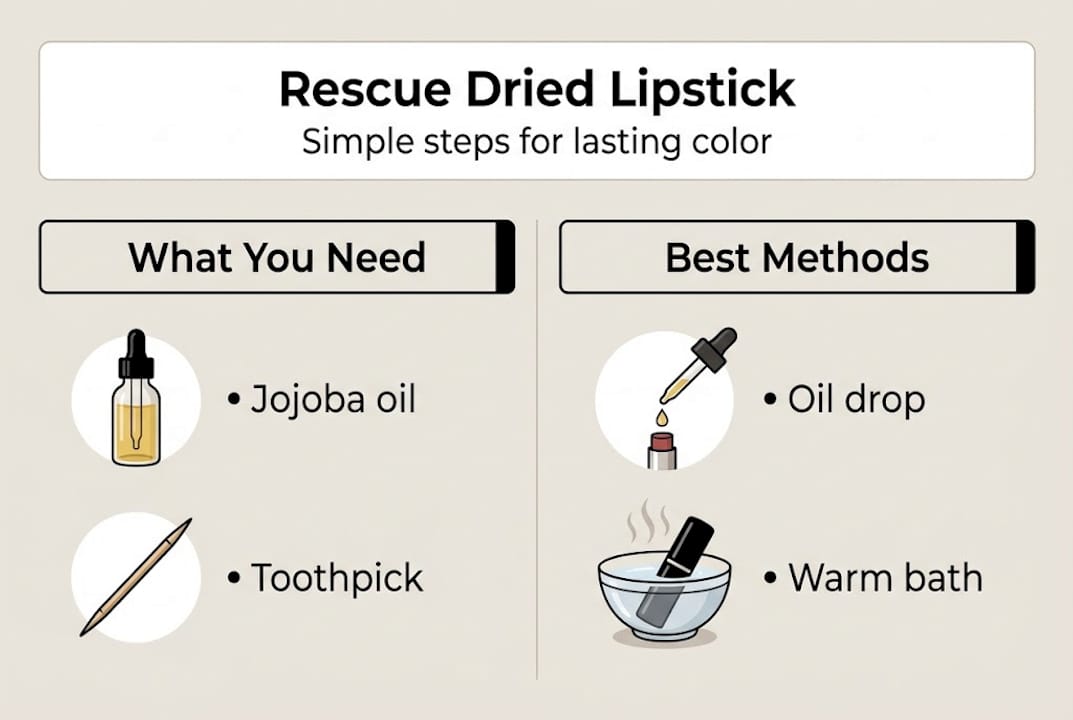
Method 1: The oil drop technique
- Open the tube and use a clean toothpick to check the consistency. If it’s thick and clumpy but not completely solid, this method works well.
- Add exactly 1 drop of jojoba, vitamin E, or fractionated coconut oil directly into the tube.
- Replace the cap and shake gently for 15 to 20 seconds.
- Let the tube sit upright for 10 minutes so the oil distributes evenly.
- Test the formula on the back of your hand before applying to lips.
Method 2: The warm water bath
- Make sure the cap is sealed tightly. This is critical.
- Fill a small bowl with warm (not boiling) water.
- Place the sealed tube in the water and let it sit for 25 to 30 minutes.
- Remove, dry the outside of the tube, and test the formula.
According to repair guides, liquid lipstick revival works best with 1 drop of oil followed by a 15 to 20 second shake and a 10 minute rest, or a sealed warm water bath for 25 to 30 minutes.
“Less is more with oil. Adding more than two drops can break down the pigment and change the finish, turning a matte formula into something sheer and slippery.”
These methods are also gentle enough for women who are mindful of avoiding lipstick mistakes that dry out lips, since over-saturating a formula creates a whole new set of problems.
Comparison: Oil method vs. warm water bath
| Factor | Oil drop method | Warm water bath |
|---|---|---|
| Best for | Mildly dried formula | Thickened or clumpy formula |
| Time needed | 10 to 15 minutes | 25 to 35 minutes |
| Risk level | Low (if 1 drop only) | Very low |
| Changes finish? | Possible if overdone | No |
| Tools needed | Oil, toothpick | Bowl, warm water |
Pro Tip: If you enjoy lipstick layering techniques, a slightly more fluid consistency after rescue can actually make layering easier and more comfortable on mature lips.
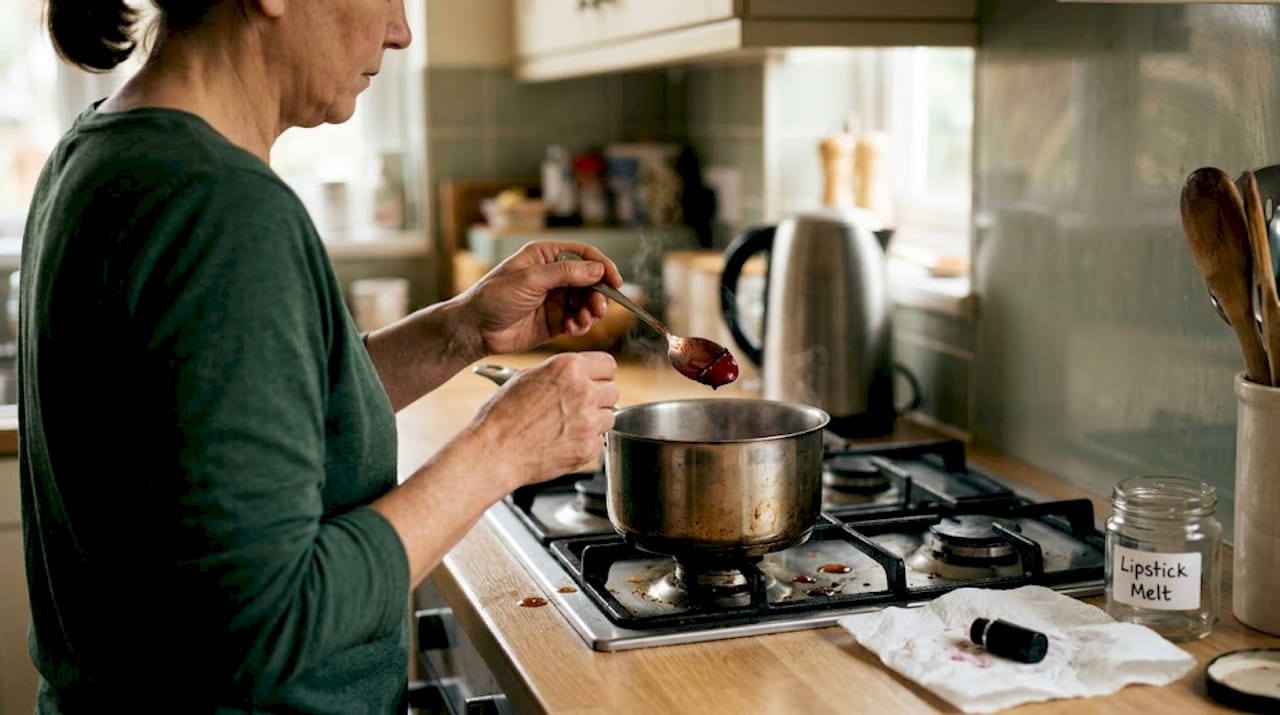
How to salvage traditional bullet lipstick
Liquid lipsticks are one thing, but what about your tried-and-true bullet formulas? Here’s how to rescue them. Bullet lipsticks dry out differently. The waxy base can crack, crumble, or lose its smooth glide, but the color pigment is usually still perfectly good.
Steps to revive a bullet lipstick:
- Soften with warmth: Hold the tip of the bullet near (not over) a candle flame or a warm lamp for 3 to 5 seconds. You want it slightly soft, not melted.
- Blend in a drop of oil or vaseline: Using a clean spatula, mix a tiny amount of jojoba oil or vaseline into the softened tip. This restores the emollient texture.
- Smooth the surface: Press the tip gently against the inside of a clean jar lid or palette to reshape and smooth any cracks.
- Let it cool: Allow the lipstick to firm up at room temperature for 15 to 20 minutes before using.
For lipsticks that are nearly finished, the melt and store method is a smart zero-waste solution: melt remnants with a small amount of vaseline or oil, then pour into a tiny jar for use with a lip brush.
Bullet lipstick rescue at a glance:
| Problem | Fix | Time needed |
|---|---|---|
| Cracked or crumbly tip | Warm gently, blend with vaseline | 20 to 30 minutes |
| Dried out texture | Add 1 drop jojoba oil, smooth | 15 to 20 minutes |
| Nearly empty tube | Melt remnants, store in jar | 30 to 40 minutes |
| Broken bullet | Melt both pieces, rejoin and cool | 30 to 45 minutes |
This approach is especially satisfying if you’ve invested in quality formulas. Understanding lipstick basics for women 40+ makes it easier to know which formulas respond best to which rescue method. Creamier formulas revive more easily than very matte or long-wear options.
Pro Tip: Store your rescued jar lipstick in the refrigerator for the first 24 hours to help it set properly. Label it with the original shade name so you don’t lose track of your color collection. Exploring types of mature lipsticks can also help you choose formulas less likely to dry out in the first place.
Troubleshooting: What to do if your lipstick is still dry
Even after a rescue attempt, some lipsticks remain stubbornly dry. Here’s what you can do next. First, don’t panic. Some formulas need a second round, and others simply need a different approach.
Try these next steps:
- Repeat the process once more. Sometimes one drop of oil isn’t enough. Try a second drop, shake again, and wait another 10 minutes.
- Switch methods. If you tried oil first, attempt the warm water bath. The two methods work on different aspects of the formula.
- Check the age of the product. If your lipstick is more than two years old, the waxes and oils in the formula may have permanently separated.
- Look for warning signs. A strange smell, unusual color change, or grainy texture that won’t smooth out are all signs the product has gone bad.
“DIY fixes can add moisture to dried lipstick, but not all products are safe to reuse, especially old or contaminated ones.”
Storage tips to keep rescued lipstick fresh:
- Keep lipstick away from direct sunlight and heat, which accelerate drying.
- Store upright in a cool, dry drawer or makeup bag.
- Always replace the cap immediately after use.
- Clean the bullet or applicator wand occasionally with a gentle makeup wipe.
If a lipstick truly can’t be saved, it’s worth exploring complete mature lip makeup guidance to find formulas that are specifically designed to stay hydrated longer. For women with reactive skin, checking out sensitive lips lipstick choices can help you avoid ingredients that contribute to faster drying in the first place.
Why rescuing lipstick is worth it for women over 40
Having explored all the practical steps, let’s take a moment to reflect on why lipstick rescue is especially meaningful for mature women. There’s a common assumption that fixing a dried lipstick is just about being frugal. We’d push back on that. It’s actually about respecting the relationship you’ve built with your beauty routine.
For women over 40, finding a lipstick shade that works with changing lip texture, skin tone, and comfort needs is genuinely hard work. When you find the one, you don’t just toss it because it dried out. You rescue it. That’s not making do. That’s knowing your own value and the value of what works for you.
There’s also a sustainability angle that matters more each year. Beauty waste is a real problem, and small acts like reviving a lipstick instead of replacing it add up. These fixes are also gentler on your lips because the oils you add, jojoba and vitamin E especially, are the same ingredients found in premium lip treatments. You’re not compromising. You’re actually improving the formula for mature lips.
Investing in comfortable long-lasting lipstick and then caring for it properly is a form of self-respect that pays off every single time you look in the mirror.
Upgrade your lipstick routine with Luméra Cosmetica
Your revived lipstick might feel brand new, but if you’re ready for even more comfort or color, here’s how Luméra Cosmetica can support your makeup journey.

At Luméra Cosmetica, we design products with mature lips in mind, so every formula delivers color, moisture, and comfort without compromise. If you’re looking for a next-level option, the Ombre Effect Lip Hi-Lighter is a favorite for adding dimension and a youthful lift to mature lips. Pair it with our guide on fullness makeup tips for mature lips to get the most out of every application. Ready to explore more? Discover more at Luméra Cosmetica and find everything you need to feel confident and comfortable in your lip routine.
Frequently asked questions
What’s the safest oil to use for rescuing dried lipstick?
Jojoba, vitamin E, or fractionated coconut oil are the best choices. As repair guides confirm, one drop of oil is all you need for liquid lipstick to avoid changing the finish.
Can I still use lipstick that smells off after trying these fixes?
No. A strong or unusual odor means the lipstick has likely spoiled. As noted in home makeup revival guides, not all products are safe to reuse, and contaminated ones should be discarded immediately.
How can I keep my lipstick from drying out again?
Seal it tightly after every use and store it in a cool, dry place away from sunlight and heat. Consistent storage habits are the single most effective way to extend your lipstick’s life.
Are these rescue methods safe for sensitive or mature lips?
Yes. Using gentle oils like jojoba or vitamin E and clean tools keeps the process safe. DIY methods suit women 40+ because they add moisture, reduce waste, and are gentle on mature skin.