

Choose a Mid Tone Rosewood Lip Blush That Flatters Women 40+

The most flattering lip blush for most women over 40 is a mid-tone rosy-peach or rosewood in a hydrating, buildable formula that mimics the natural flush of your own lips. That single choice covers the widest range of undertones and skin depths, and it avoids the two things that age a mouth fastest: chalky pale nudes and flat, drying matte finishes. The rest comes down to two quick tests, covered below: your undertone and your natural flush.
TL;DR:
- Stick to mid-tone rosy-peach or rosewood shades in hydrating, buildable formulas to avoid drying and chalky appearances on mature lips.
- Determine your undertone through vein, jewelry, or white-paper tests to guide the best color family, such as peach for warm or mauve for cool undertones.
- Choose lip shades that match your skin depth, with soft rosewoods and peaches for fair or light skin, and richer berries or brick reds for deeper skin tones.
- Prioritize hydrating, satin, or creamy formulas with nourishing ingredients like hyaluronic acid and shea butter over matte and long-wear formulas that can settle into fine lines.
- Test lipstick shades in natural daylight, compare on lips and skin, and use the bite-lip trick to confirm your ideal hue before purchasing.
Table of Contents
- How Do You Identify Your Undertone for Lip Color?
- Which Lip-Blush Shades Match Your Skin Depth?
- What Formula and Finish Work Best on Mature Lips?
- How Do You Swatch and Test a Lip-Blush Shade Before Buying?
- Can You Mix and Layer Your Own Lip-Blush Shade?
- What’s the Best Application Routine for a Soft Blushed Lip?
- Who’s Behind This Lip-Blush Guidance?
- Does Your Natural Lip Color Change Which Shade Works?
- Should Your Lip Blush Change for Day, Evening, or Special Events?
- How Do Eye Color and Hair Color Affect Your Lip-Blush Choice?
- What Mistakes Should You Avoid When Picking a Lip-Blush Shade?
- Why Undertone-First Shopping Beats Trend-Chasing for Women 40+
- Ready to Try a Shade That’s Already Matched for You?
- Sources
How Do You Identify Your Undertone for Lip Color?
Your undertone doesn’t change with a tan, a season, or a new haircut, so it’s worth pinning down once and using it as your permanent shade compass. Three low-effort tests get you there in about five minutes, and Liberty’s color-matching guidance backs an undertone-first approach as the most reliable way to make lipstick choices predictable rather than a gamble.
- Vein test: Look at the veins on your inner wrist in natural light. Blue or purple veins usually mean cool undertone; green veins mean warm; a mix of both often means neutral.
- Jewelry test: If silver jewelry flatters you more than gold, you likely lean cool. If gold looks richer against your skin, you likely lean warm.
- White-paper test: Hold a plain white sheet next to your face. Skin that looks yellow or golden against the white is warm; skin that looks pink or rosy is cool.
Cross-check with the bite-lip trick covered in detail later, since the flush that appears after a gentle bite tends to confirm whether your natural coloring skews warm or cool. Once you know your category, the shade map is simple: warm undertones look best in peach, coral, and brick; cool undertones look best in berry, mauve, and rose; neutral undertones have the most flexibility and usually do well in mid-tone roses that split the difference.
Which Lip-Blush Shades Match Your Skin Depth?
Undertone tells you the color family. Skin depth tells you how strong or soft that color should read. Who What Wear’s roundup of lipsticks for mature skin points to mid-tone rosewoods, soft berries, brick reds, peachy browns, and warm plums as the shades that consistently photograph and wear well on skin over 40, while flagging very pale or icy-cool colors as the ones most likely to look ashy or chalky, especially on deeper skin.
Here’s how that breaks down by depth:
- Fair skin: Soft rosewood, dusty pink, or a peachy nude with a hint of warmth. Avoid stark cool pinks, which can wash out fair coloring.
- Light skin: Warm rose, soft coral, or muted berry. These read as a natural flush rather than a painted-on color.
- Medium skin: Brick red, terracotta, or a warm mauve. Medium depth carries more pigment well without looking heavy.
- Tan skin: Deep rosewood, cinnamon, or warm plum. These shades have enough depth to stand up against richer skin without disappearing.
- Deep skin: Rich berry, deep brick, or warm chocolate rose. Pale or icy shades are the biggest mismatch here, since they tend to gray out rather than brighten.
Across every depth, a pink-peachy nude with a glossy finish shows up again and again as the shade experts call closest to universally flattering, since it echoes the natural color of youthful lips rather than fighting it, according to SheFinds. If you’re shopping for a fair complexion specifically, Lumeracosmetica’s shade guide for fair skin breaks those options down further.
What Formula and Finish Work Best on Mature Lips?
Shade only does half the work. Texture decides whether that shade looks soft and lived-in or sits on top of every fine line like paint in a crack. Lips lose volume and collagen with age, and that changes how any formula behaves on them. Guides on caring for aging lips recommend hydrating, nourishing formulas over anything drying, and steering clear of alcohols and heavy fragrance that strip moisture further.
Makeup artists interviewed by Today consistently point mature lips toward sheer tints, balmy glosses, and satin or creamy finishes, with hyaluronic acid, jojoba oil, shea butter, and vitamin E named as the ingredients most worth checking for on a label.
- Sheer tints and lip oils for daily wear, since they build color without fighting the lip’s natural texture.
- Satin or creamy lipsticks when you want more pigment without the drag of a fully matte formula.
- Balmy glosses over the center of the lip for a soft, dimensional shine.
Ultra-matte and long-wear liquid formulas tend to dry the lip surface and settle into fine lines within a few hours, which draws attention to exactly what you’re trying to soften. Save a bolder matte for a night out where touch-ups aren’t a concern, and lean hydrating for everyday wear.
Pro Tip: Keep a hydrating balm underneath any lipstick, even a satin one. It’s the fastest way to stop color from grabbing onto dry patches and looking patchy by lunchtime.
How Do You Swatch and Test a Lip-Blush Shade Before Buying?
A shade can look perfect on a stick and wrong on your mouth, so test before you commit. Run through this short sequence in daylight, not under store lighting, which tends to shift warm tones cooler than they really are.
- Swatch in natural light. Apply a small amount to your lips near a window and step back from any mirror light that has a yellow or blue cast.
- Compare across three surfaces. Check the color on your lips, on the inner wrist, and on a plain sheet of paper. If it looks orange on paper but fine on skin, that’s normal; if it looks gray or chalky on skin specifically, that’s your ashy-cast warning sign.
- Try the bite-lip trick. Bobbi Brown’s classic method has you gently bite your lower lip and look at the flush that results. That color is close to your ideal “no makeup” makeup shade, and it’s a fast gut check against whatever you’re holding.
- Build up slowly. Apply one light layer, wait a minute, then add a second. If the color turns muddy or uneven rather than deepening cleanly, the formula likely isn’t blending well with your skin’s natural pigment.
- Test for feathering. Smile, talk, and drink water for a few minutes after applying. Formulas that migrate into fine lines this fast will do the same all day.
Can You Mix and Layer Your Own Lip-Blush Shade?
Sometimes the shade you want doesn’t exist in a single tube, and that’s fine, because most lip-blush looks are actually two or three products working together. Start with a neutral balm base, then build color in small amounts, testing on the back of your hand before your lips take the risk.
- Liner plus balm: Line the lip lightly, then rub a clear or tinted balm over it with a fingertip for a soft, blurred tint instead of a hard edge.
- Tint plus clear gloss: Add a drop of clear gloss to warm up a tint that reads slightly too cool, or mix in a berry tint to cool down something too peachy.
- Cream base then gloss: Apply a creamy lipstick first, then press gloss only into the center of the lip for dimension without full-lip shine.
Keep proportions small, roughly a quarter-teaspoon scale when blending pigments, and patch test on your hand first, especially if you’re combining products with different active ingredients. If you’ve mixed three products and still can’t land on the right shade, that’s usually the signal to get a professional match instead of guessing further. Lumeracosmetica’s guide to building a lip combo walks through pairing options in more depth.
Pro Tip: Mix on the back of your hand first, not directly on your lips. It’s a five-second check that saves you from an uneven, blotchy first application.
What’s the Best Application Routine for a Soft Blushed Lip?
Getting a shade right on paper doesn’t guarantee it looks right on your face, and the application steps matter almost as much as the color itself for a soft, natural finish.
- Exfoliate weekly. A gentle lip scrub or a soft toothbrush once a week clears flaky skin that would otherwise catch color unevenly.
- Prep with balm. Apply a hydrating balm a few minutes before color and let it absorb, per the application tips Today’s makeup artists recommend for mature lips.
- Line lightly. Use a liner close to your natural lip color to define the edge without a hard outline.
- Apply and press. Put on your base color, then press and blend the edges with a fingertip so it doesn’t sit as a flat layer.
- Add gloss to the center. A small dot of gloss on the center of the lower lip creates dimension and makes the whole look appear fuller.
For midday touch-ups, blot first instead of adding a fresh layer on top of what’s already there. A quick blot removes the flat, worn-down color without building up product that can look caked by evening.
Who’s Behind This Lip-Blush Guidance?
This guidance draws on Rebecca’s ongoing coverage of shade selection for Lumeracosmetica, including deeper dives into picking a lip color for your skin tone and choosing lip shades naturally for women 40+. Lumeracosmetica offers curated lip kits, along with individual lipsticks, liners, glosses, and oils, with formulas designed for women 40 and older.
Does Your Natural Lip Color Change Which Shade Works?
Your starting lip color acts as a filter for whatever shade you put on top of it, which is why the same lipstick can look completely different on two women with the same undertone. If your natural lips already carry a deep pigment, a lighter shade will mix with that base tone and shift warmer or cooler than the color looks in the tube. Sheer and semi-sheer formulas are the most affected, since they let more of your natural pigment show through, while a true opaque cream covers more of that base color.
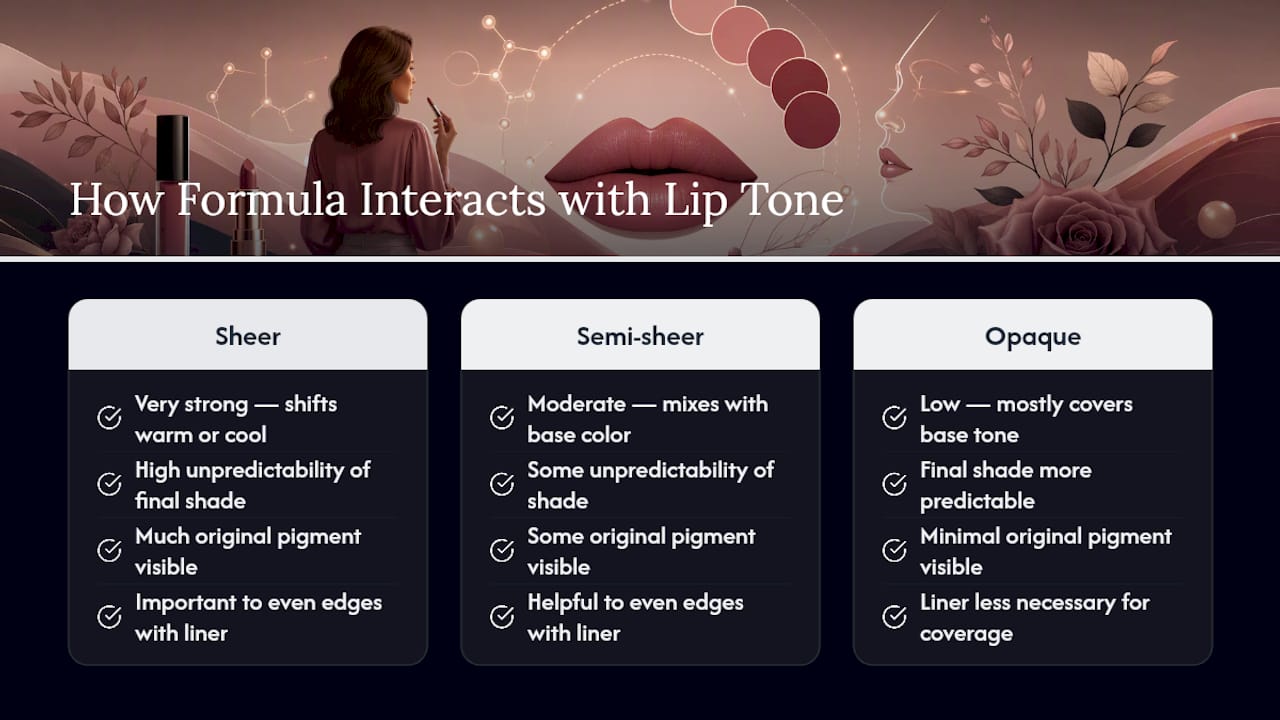
Uneven natural pigmentation, common on the lip edges as skin ages, is another reason a liner matters more than most people think. A liner close to your natural edge tone evens out that variation before color goes on, so the final result reads as one consistent shade rather than patchy.
If your lips run naturally darker in the center and lighter at the edges, test any new shade in both spots rather than just at the center, where color often looks richest. And if you’re unsure whether a shade will shift on your particular lip tone, a sheer tint is the lower-risk way to see how a color interacts with your natural pigment before committing to a fuller-coverage version in the same family.
Should Your Lip Blush Change for Day, Evening, or Special Events?
The shade that works at your desk isn’t always the one that works under event lighting, and adjusting for the occasion is less about buying more products and more about adjusting intensity and finish.
For daytime, a sheer tint or lip oil in your rosewood or peachy-rose family keeps things soft and low-maintenance, especially if you’re not planning touch-ups between meetings. For evening, the same shade family in a slightly richer, more opaque version reads better under artificial light, which tends to flatten color and mute warmth. A satin or cream finish holds up better than a sheer tint once the lighting turns golden or dim.
For events with photos, warm mid-tones photograph more reliably than cool or icy shades, which can look flat or grayish under flash. If you’re wearing a bold eye look for a special occasion, pull your lip back toward a softer version of your everyday shade rather than doubling up on intensity everywhere, since one strong focal point usually looks more polished than two competing ones.
How Do Eye Color and Hair Color Affect Your Lip-Blush Choice?
Undertone and skin depth do the heavy lifting, but eye and hair color can push you toward the warmer or cooler end of your shade family. Warm brown or hazel eyes tend to pair well with peachy and brick tones, since the warmth in the lip echoes the warmth in the eye. Cooler blue or gray eyes often look sharper next to berry and mauve shades, which create contrast rather than blending into a monochrome look.
Hair color shifts the same way. Warm blondes and coppery reds generally suit coral and peachy-rose shades, while cool ash blondes, silver, and cool brunettes tend to look more polished in rose, berry, or mauve. Gray hair, common for many women in this age group, actually pairs well with a slightly richer lip than you might expect, since a too-pale nude can wash out next to silver strands and make the whole face look flat.
None of this overrides undertone. Think of eye and hair color as a fine-tuning knob within your shade family, not a reason to jump to a completely different color group.
What Mistakes Should You Avoid When Picking a Lip-Blush Shade?
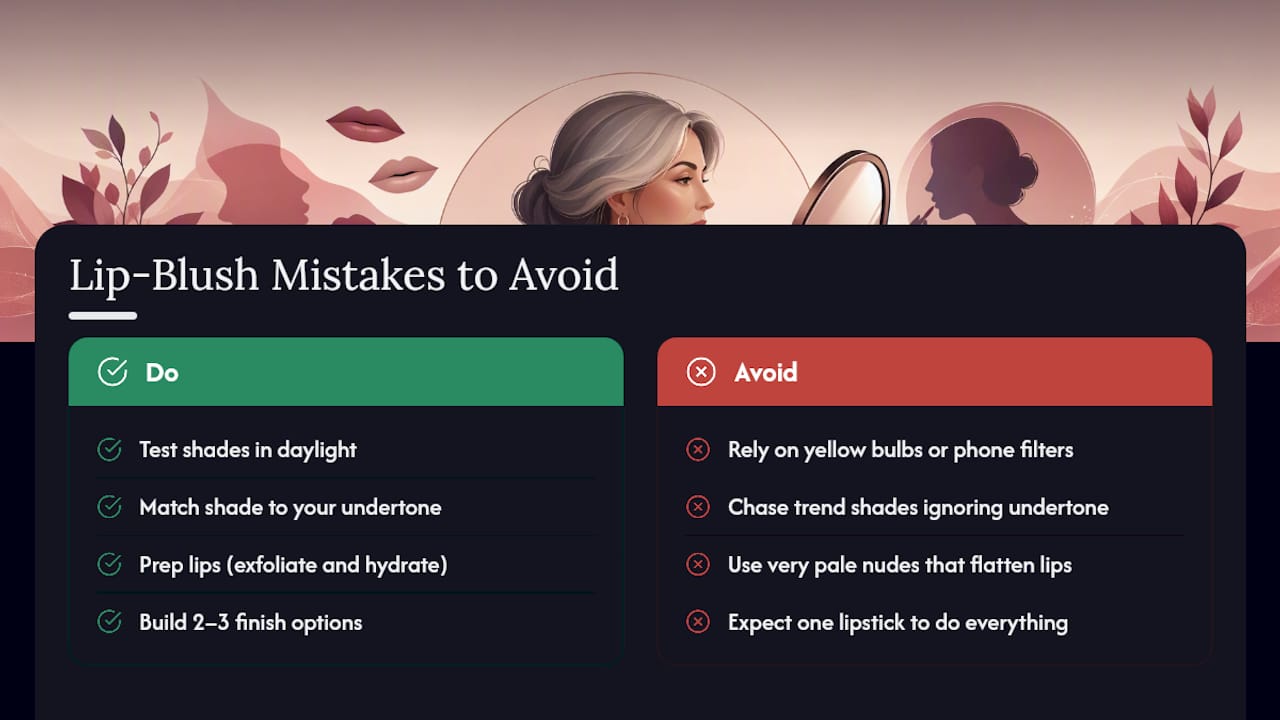
The biggest mistake is testing color under the wrong light, whether that’s yellow bathroom bulbs or a phone camera filter, and then trusting that read over how the shade looks in daylight. A second common error is chasing a trend shade that doesn’t match undertone at all, which explains why a color that looked great on someone else can look off on you.
Going too pale is another frequent misstep. A very light nude can flatten mature lips and make them look smaller rather than fuller, especially paired with an ultra-matte finish that catches every fine line. On the opposite end, choosing a heavily pigmented matte for daily wear often backfires, since it needs frequent, precise reapplication that’s hard to maintain through a normal day of eating and talking.
Skipping the prep step is easy to overlook but changes the outcome more than people expect. Applying color straight onto dry, flaky lips almost guarantees a patchy result no matter how good the shade is. And finally, buying a single lipstick and expecting it to do everything, day and night, casual and dressed up, sets up disappointment. A shade family with two or three finish options, from sheer to satin, covers more real situations than one perfect matte tube ever will.
Why Undertone-First Shopping Beats Trend-Chasing for Women 40+
Most lip-color advice online still treats shade selection like a personality quiz, matching you to a color based on vague style labels rather than the two things that actually determine what looks good: undertone and skin depth. That approach fails women over 40 more than any other group, because it ignores how much lip texture and volume change with age, and it keeps steering people toward the same flat matte trends that photograph well on younger, plumper lips but read as dry and aging on lips that have lost some of that natural cushion.
The undertone tests and the bite-lip trick matter more than any single product recommendation in this guide, because they’re the only steps that adapt to your actual face rather than a trend cycle. Once you know your undertone, you can walk into any store, ignore the seasonal marketing, and pick correctly nine times out of ten. Formula matters just as much as color here. A great shade in a drying matte will still look worse on mature lips than a slightly-off shade in a hydrating, buildable finish. If you take one thing from this guide, prioritize testing your undertone and choosing texture before you fall in love with a shade name.
— Rebecca
Ready to Try a Shade That’s Already Matched for You?
Testing undertones and mixing your own shade at home works, but it takes time most of us don’t have on a Tuesday morning. Lumeracosmetica builds curated lip kits where the shade-matching work is already done, pairing lipstick, liner, and gloss in combinations chosen around skin tone rather than trend cycles.
Every formula in the lineup leans hydrating rather than drying, with ingredients like hyaluronic acid and shea butter built into the base rather than treated as an afterthought. If you’d rather skip the trial-and-error swatching and start from a shade someone else has already matched to your coloring, the Lumeracosmetica shade guide is the place to start, and the current lip kit lineup is a click away at Lumeracosmetica.
Sources
- How to care for aging lips — Today
- 11 Best lipsticks for mature skin — Who What Wear
- Bobbi Brown’s trick to find the right natural lipstick shade — Prevention


