

8–10 Minute Step by Step Natural Eye Makeup for Beginners

Clean and prime the lid, sweep on a neutral base, buff a matte shade into the crease, deepen the outer corner, smudge a soft liner along the lash line, layer mascara, then groom the brows and set with a light dust of powder. Done right, that’s a seven-step sequence you can finish in under 10 minutes, and the payoff looks lifted, soft, and like your eyes, not a costume. Before you start, have primer, two or three neutral shadows, a fluffy brush, a smudge brush, a lash curler, and a clean mascara wand within reach.
TL;DR:
- Using only a few targeted products, such as a neutral base, matte bronzer, and smudge-friendly liner, creates a natural, long-lasting eye look.
- Applying primer, building a soft crease, and carefully blending outer edges are essential to avoid harsh lines and ensure smooth, natural shading.
- Adjustments for different eye shapes involve subtle placement shifts—like raising the crease for hooded eyes or concentrating color on the outer third for small eyes.
- Proper lash curling, light mascara layers, and brow grooming enhance the lift and framing of the eyes without overdoing volume.
- Consistently using primer, setting powder, and gentle removal routines significantly improve makeup durability and skin health.
Table of Contents
- What You Need Before You Start Natural Eye Makeup Step by Step
- The Step-by-Step Natural Eye Makeup Routine
- Adjusting the Routine for Different Eye Shapes
- Fast Fixes for Common Beginner Mistakes
- Who’s Behind This Guide, and Where to Go Next
- Tightlining or Soft Smudged Liner: Which Suits a Natural Look
- Mascara Application That Adds Lift Without Clumps
- Brow Grooming That Frames the Whole Look
- Making the Look Last Through a Full Day
- Taking It Off and Caring for Your Eyes Afterward
- Practicing the Motions Is What Actually Builds Skill
- Where to Find the Products This Routine Actually Uses
- Sources
What You Need Before You Start Natural Eye Makeup Step by Step
Beginners waste more time hunting for the “right” 12 shadows than they spend actually applying makeup. You need far fewer products than the beauty aisle wants you to believe.
Here’s what actually earns a spot on your counter:
- Eye primer. This is the step people skip most and regret most. A thin layer keeps soft, sheer shadows from sliding into the crease by midday, and it’s the difference between a look that survives lunch and one that doesn’t, according to The Chic Tribe’s natural makeup tutorial.
- A light neutral base shade. Something close to your skin tone, in matte or satin, evens out any discoloration on the lid before you add depth.
- A matte bronzer or taupe shadow. One shade, used everywhere from crease to outer corner, does more work for a natural look than a ten-pan palette.
- A creamy brown or soft black pencil. For tightlining and light smudging, not a sharp graphic line.
- Black mascara. Buildable, not waterproof, unless you specifically need water resistance.
- A fluffy blending brush, a smaller pencil or crease brush, and an eyelash curler.
On shade selection: if your skin has warm undertones, lean toward bronze, terracotta, or golden brown. Cooler undertones look better in taupe, mauve, or soft gray. Matte finishes read as more sophisticated on mature skin because shimmer tends to settle into fine lines and highlight texture you’d rather not emphasize, a point echoed in Luméra Cosmetica’s guide for women over 40. Satin finishes split the difference nicely if you want a little life without full shimmer.
Prep takes under a minute: cleanse, moisturize, and let the moisturizer sink in for a couple of minutes so primer doesn’t slide. Dab on a light concealer if you need it, then apply the eye primer and let it set for 30 seconds before you touch a shadow brush to your lid.
The Step-by-Step Natural Eye Makeup Routine
This is the full sequence, start to finish. Each step includes the motion, not just the product, because motion is what separates a soft, natural finish from a smudged mess.
1. Prime the lid (30 seconds). Swipe a small amount of eye primer across the lid and just under the brow bone using your fingertip. Pat, don’t rub, so you don’t drag any concealer underneath. Let it set for about 30 seconds while you grab your brushes.
2. Apply the base shade (1 minute). Load a fluffy brush with your neutral base shadow, tap off the excess, and sweep it across the entire lid from lash line to brow bone. This evens out lid tone and gives every later step something consistent to blend into. Think of this as priming color, not adding a “look” yet.
3. Build the crease for depth (2 minutes). This is the step that makes a natural eye look intentional instead of bare. Load your fluffy brush lightly with a matte bronzer or taupe shadow, tap off most of it, and place it directly in the crease using a windshield wiper motion, back and forth in small arcs. To find your crease if you’re not sure where it is, look straight ahead in a mirror and feel for the natural fold when you glance down. Deposit color there and blend upward and outward in soft circles until the harsh edge disappears. A single well-blended shade here does more than five stacked ones, which is exactly the kind of one-product technique Meg O. on the Go recommends for beginners.
4. Deepen the outer third (1 minute). Take the same crease shade, or a touch more of it on your brush, and press it into the outer corner of the lid in a soft “V” shape, roughly where your lash line meets your brow tail. This is what gives eyes a lifted, slightly smoky finish without looking heavy. Blend the inner edge of that V so it fades into the crease color with no visible line, using small circular motions rather than side-to-side sweeps.
5. Line softly, or tightline instead (1 to 2 minutes). Choose one: a soft smudged liner or a tightlined lash line, not both, for a genuinely natural finish. If lining, run a creamy brown or soft black pencil along the upper lash line in short strokes, then immediately go over it with a small smudge brush to soften the edge before it sets, a technique Meg O. on the Go uses to avoid a harsh cartoon line. If tightlining, tug the lash line gently upward and tuck the pencil tip between the lashes at the base, filling in the gaps you’d otherwise leave bare. Tightlining reads as “you just have naturally dark lashes,” which is the whole point of the natural aesthetic.
6. Curl and coat lashes (1 minute). Curl lashes at the base, hold for five seconds, then move the curler slightly toward the tips and repeat once. Apply mascara starting at the root, wiggling the wand side to side as you pull upward to distribute product evenly and avoid clumping. One coat on top lashes and a light swipe on the bottom, if any, keeps things soft.
7. Groom brows (1 minute). Brush brow hairs upward with a spoolie, then fill any sparse patches with light, hair-like strokes using a pencil or powder one shade lighter than your natural brow color. Set with a clear or tinted brow gel.
8. Set and check (30 seconds). Dust a translucent powder under the eyes with a small brush to catch any fallout, then sweep it away with a clean brush or tissue. Step back, look in natural light if you can, and check that both eyes match in intensity.
Total time: 8 to 10 minutes once you’ve done it a few times. Expect your first attempts to run closer to 15, and that’s normal.
Pro Tip: Load your brush, then tap it against the back of your hand three times before it touches your eyelid. That single habit prevents almost all the “too much product” mistakes beginners make with crease shadow, and it costs you two extra seconds per step.
Adjusting the Routine for Different Eye Shapes
The seven steps above stay the same. What changes is where you place color and how much of it you use.
- Hooded eyes: Place your crease shade slightly higher than where you feel the fold, since the visible crease often disappears when eyes are open. Keep the transition from base to crease color extra soft, and skip heavy shimmer on the lid, which tends to crease into the fold by midday.
- Small eyes: Stick to lighter base shades across the whole lid and concentrate any depth strictly in the outer third rather than the full crease. A heavy crease on small eyes can visually shrink them further.
- Almond eyes: You have the most flexibility here. Add a touch of lift with a slightly lighter shade just under the brow bone, and let the outer V carry the depth for balance rather than spreading it across the whole lid.
- Deep-set eyes: Favor lighter, satin-finish shadows on the lid itself to bring the eye forward visually, and save your darkest shade for a thin line right at the outer corner instead of the whole crease.
Quick customization checklist before you start: identify your shape in the mirror with eyes open and relaxed, pick one adjustment from above, apply your base as normal, then shift only the crease placement or shadow intensity accordingly. You don’t need a different routine for every shape, just a different hand.
Fast Fixes for Common Beginner Mistakes
Most natural-eye mistakes come from too much product or not enough blending, and both are fixable in under a minute.
- Harsh crease line: Take a clean fluffy brush, no product, and buff over the edge in circular motions until it softens. Add nothing until the line disappears.
- Shadow fallout under the eyes: Apply loose powder under the eye before you start shadow, so any fallout sits on top of the powder and brushes away cleanly instead of smearing into concealer.
- Creasing shadow midday: This almost always traces back to skipped primer, so build that step back in tomorrow, per The Chic Tribe.
- Clumpy mascara: Wipe the wand on a tissue before the second coat, then apply in one clean upward stroke rather than several short jabs.
- Uneven brows: Brush both brows upward first, then compare, since asymmetry often disappears once the hairs sit in the same direction.
If a step goes seriously wrong, a damp cotton swab removes just that section without forcing you to redo the whole eye.
Who’s Behind This Guide, and Where to Go Next
This routine comes from Rebecca at Luméra Cosmetica, who focuses on natural, age-appropriate techniques rather than trend-chasing looks. Her tutorials are built around the same premise: fewer products, better placement, softer edges.
If you want a version tailored to your exact situation, these two go deeper than a general routine can:
- The light makeup look step by step guide, for readers who want the everyday version with more finish detail.
- The natural eye makeup for brown eyes guide, which adjusts shade choices and placement specifically for brown eyes.
Photograph your own progress at each step, base, crease, outer corner, liner, finished look, and compare against these guides. Beginners who follow along with step visuals tend to place brushes and blend more accurately than those working from memory alone.
Tightlining or Soft Smudged Liner: Which Suits a Natural Look
Pick one, not both, if the goal is genuinely soft. Tightlining fills the gaps between your upper lashes at the root, making lashes look naturally thicker without any visible line above them. It’s the better choice if you have oily lids, since a topline liner tends to migrate or smudge into the crease by afternoon on oilier skin.
Soft smudged liner sits just above the lash line and gets blurred immediately with a small brush before it dries. It gives slightly more definition than tightlining and suits readers who feel like tightlining alone leaves their eyes looking a bit undefined in photos. The trick is using a creamy formula, not a liquid or gel liner meant for a sharp wing, then smudging within seconds of application so it never fully sets as a hard line.
Both techniques use the same tool: a small, dense pencil brush that lets you work the product into the lashes or blur an edge without dragging color where you don’t want it. If your hand isn’t steady yet, tightlining is more forgiving, since minor unevenness disappears between the lashes rather than sitting exposed on bare skin. Practice tightlining on a lower setting of magnification first. Staring too closely tends to make people overcorrect and press too hard, which stings and smears the pencil.
Mascara Application That Adds Lift Without Clumps
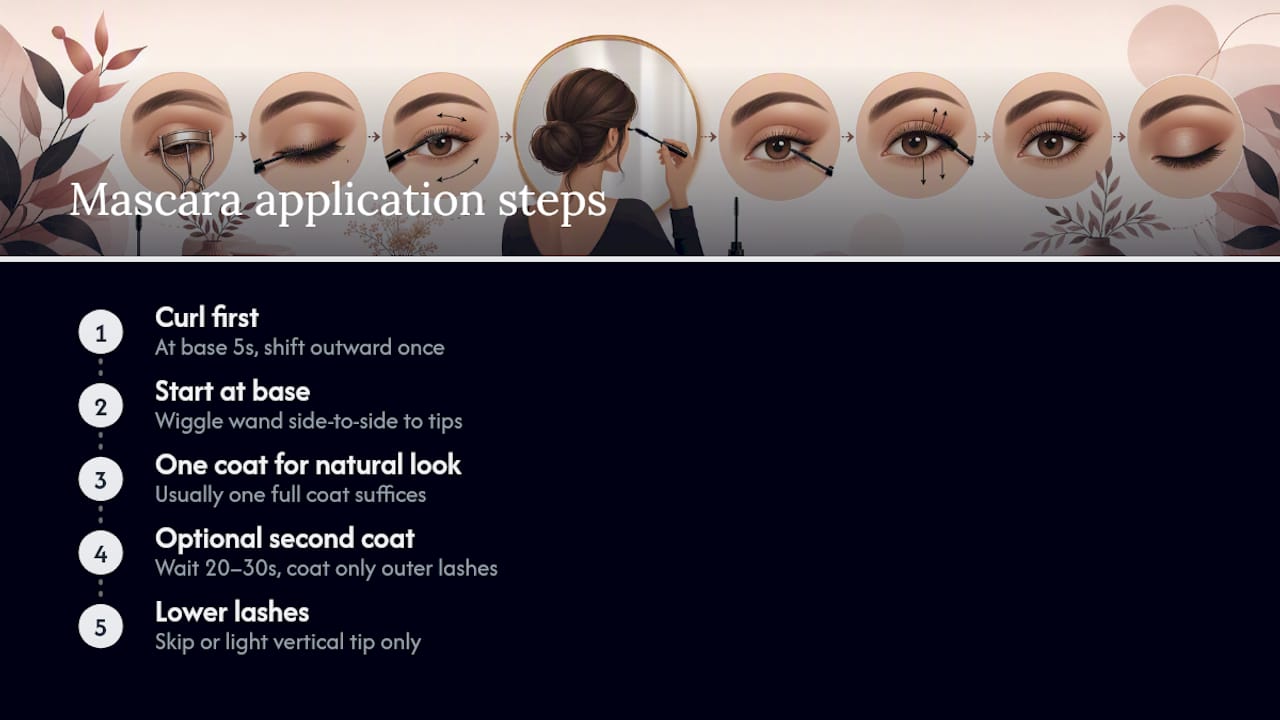
Curl before you coat. Skipping the eyelash curler and going straight to mascara is one of the most common reasons lashes end up looking straight and flat instead of lifted, no matter how much product you layer on. Curl at the base, hold for five seconds, then shift the curler slightly outward and repeat once for a natural curve rather than a single hard bend.
Apply mascara starting at the base of the lashes and wiggle the wand gently side to side as you move upward toward the tips. That wiggle motion is what separates lashes and coats them evenly, instead of dragging a thick clump straight up the center. One full coat is usually enough for a natural look. If you want more definition, wait 20 to 30 seconds for the first coat to set before adding a second, focusing only on the outer lashes rather than recoating the whole lash line.
Skip mascara on the lower lashes entirely, or use only a light swipe with the tip of the wand, held vertically. Heavy lower-lash mascara is one of the fastest ways to make a soft look feel harsh again.
Brow Grooming That Frames the Whole Look
Brows do more for a natural eye look than most beginners give them credit for. Bare, unbrushed brows can undercut even perfectly blended shadow, while groomed brows make the whole eye area look intentional.
Start by brushing brow hairs straight up with a clean spoolie to see where the natural gaps actually are, rather than guessing. Fill sparse areas with short, hair-like strokes rather than one solid line. A pencil or powder one shade lighter than your natural brow color looks far more convincing than matching your hair color exactly, since brows are rarely one solid shade in nature. Brush through again after filling to blend the strokes into your real hairs, then set with a clear or lightly tinted brow gel to hold everything in place for the day.
If your brows have thinned with age, a light hand with a brow pencil or fine-tip brow pen fills gaps without looking drawn on, which matters more than density here.
Making the Look Last Through a Full Day
Primer is still the single biggest factor in how long your eye makeup holds up, more than any powder or spray applied afterward. A thin layer under both shadow and liner is what keeps soft neutral shades from migrating into the crease by early afternoon, particularly if your lids run oily.
Beyond primer, a light dusting of translucent powder over your finished shadow, applied with a fluffy brush in gentle downward strokes, sets everything without adding visible texture. Avoid pressing powder in with a sponge, which can disturb the blending you just did.
For mascara longevity, avoid touching or rubbing your eyes once it’s dry, since that’s the most common cause of under-eye transfer, not the formula itself. If you know you’ll be in heat or humidity, a single light pass of setting spray held about 10 inches from your face and swept in an X pattern helps everything hold without feeling stiff.
Taking It Off and Caring for Your Eyes Afterward
Never skip removal, even on nights you’re exhausted. Left-on eye makeup overnight is one of the more common causes of irritated lids and clogged lash follicles, and it undoes any good the primer step did.
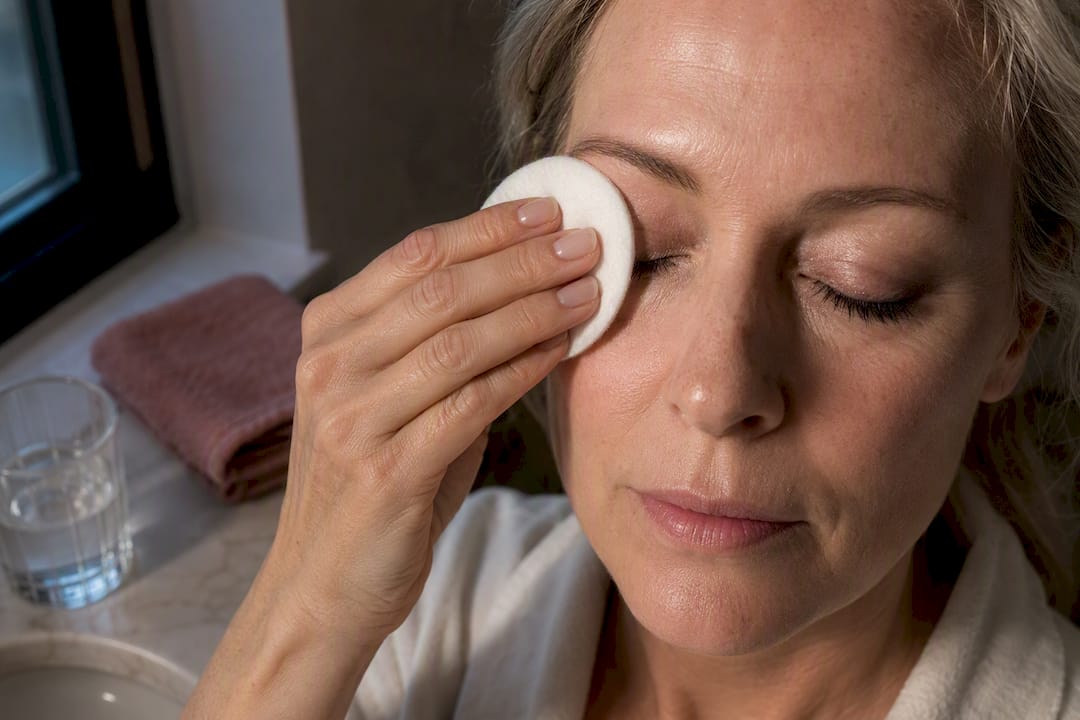
Use a gentle, oil-based cleanser or micellar water on a cotton pad, and hold it against closed lids for about 10 seconds before wiping, rather than scrubbing immediately. This lets the product dissolve stubborn mascara and liner instead of dragging at the delicate skin. Wipe downward in the direction lashes grow, then follow with a lightweight eye cream to replenish moisture, especially if you’re prone to dryness or fine lines. Skipping moisturizer after removal is a common reason under-eye skin looks crepey by morning, unrelated to the makeup itself.
Practicing the Motions Is What Actually Builds Skill
Nobody gets a perfectly blended crease on the first try, and that’s not a personal failing, it’s just how a new hand motion works. Spend 10 seconds extra blending each zone the first few times you practice this routine, even after it looks “done.” That small habit is what eventually makes soft edges automatic instead of something you have to think about.
I’ve watched the biggest confidence shift happen for readers over 40 who assumed shimmer and bold color were their only options for looking “finished.” A matte crease shade and a soft smudged line, done with a light hand, often reads as more put-together than heavier color ever did. Once you’re comfortable with the base sequence, feel free to shift your neutral shades warmer or cooler within that safe range. The steps stay the same. Only the shade name changes.
— Rebecca
Where to Find the Products This Routine Actually Uses
You don’t need a 12-pan palette to run this routine well. You need a primer that holds, two or three neutral shadows in the right undertone, and a liner that smudges instead of streaks, which is exactly the gap Luméra Cosmetica’s eye products are built to fill for readers who’d rather not guess their way through a beauty aisle.

A neutral shadow trio in warm or cool tones covers steps two through four of this routine in one compact case, so you’re not blending three separate palettes to find shades that actually work together. Pair that with a long-wear eye primer for the staying power this whole guide keeps coming back to, and a creamy smudge-friendly liner for step five, and you’ve got the full kit without excess. Because Luméra Cosmetica’s shades are matched by makeup artists with mature and mid-tone skin in mind, the guesswork of “will this look chalky or ashy on me” mostly disappears before you even open the compact.
If you want the full routine mapped to specific products rather than general categories, visit the Luméra Cosmetica eye collection to see current shade sets and pick the trio closest to your undertone.
Sources
- Effortless Natural Makeup Eyes Tutorial - The Chic Tribe
- Natural Eye Makeup - Minimal and Easy! | Meg O. on the Go


